Shift Box
PLUS -
Product Support Page
Last updated 6/11/12
Basic instructions:
- Once installed,
this shift box is simple to use. Simply press the
up-shift button to advance to the next gear, or press
the down-shift button to drop to a lower gear.
- This shift box
will boot up in 3rd gear every time as a safety in case
the shift box would ever reboot due to a power
connection problem.
- By default the
downshift protection RPM is 4500RPM, see the menu below
to change this, or disable the downshift protection.
- To use the RPM up-shift feature, you
must set the shift points to your desired RPM in the menu.
Set the shift point ~1000RPM sooner than you want the shift
to be made to start, and adjust as necessary. This is due to
the delay inside the transmission to engage the clutches.
You must enable the UP-SHIFTER in the menu to begin using
this feature.
- The overdrive off feature can be used
by up-shifting to 4th gear. Press and hold the up button
until the O/D off LED illuminates and the shift box
downshifts to 3rd gear. To turn O/D back on, up-shift to 3rd
gear and press and hold the up button until the O/D off LED
turns off and the shift box up-shifts to 4th gear.
- Note that the
shifts are made at full line pressure, so learning the
timing on when to make the shift will make using this
shift box much more pleasurable on the street.
- Note that the
transmission has a delay of 500ms-1000ms for the actual
shift to complete. This will vary some with engine speed
and power level, and transmission adjustments. Be sure
to shift early until you learn how long your
transmission takes to perform the shift at WOT to
prevent a possible over-rev of the engine.
Using the menu:
- To enter the menu, down-shift to
first gear using the down-shift button, then hold the
down-shift button for ~ 5 seconds until you hear a
series of beeps. The word MENU will be displayed
- Below are the menu options. Bold
print is what will be displayed on the LED display. Use the
up button to toggle a menu item or advance a value. Use the
down button to go to the next menu option.
MENU
UP-SHIFTER = ENABLED/DISABLED (Default is disabled, to
use the RPM up-shifter feature, change to enable)
SHOW-ZEROS = ENABLED/DISABLED (Default is enabled, shows
5000RPM as 50 & 750ms as 75 for faster displaying of the menus)
DOWN-SHIFT-PROTECTION = ENABLED/DISABLED (Default is
enabled, change if you do not wish to use the down-shift
protection)
GEAR-SCROLL = ENABLED/DISABLED (Default is enabled. This
option changes whether the gear numbers scroll or simply change)
AUDIO = ENABLED/DISABLED (Default is enabled. This option
mutes the alerts when a shift is blocked, will not affect the
menu beeps)
DOWN-SHIFT-PROTECTION = 4500 (Configurable from
3500-7000RPM. Default is 4500RPM)
1-2-UP-SHIFT-RPM = 5500 (Set the 1-2 shift point,
configurable from 5000-12000RPM)
2-3-UP-SHIFT-RPM = 5500 (Set the 2-3 shift point,
configurable from 5000-12000RPM)
3-4-UP-SHIFT-RPM = 5500 (Set the 3-4 shift point,
configurable from 5000-12000RPM)
UP-SHIFTER DELAY = 750 (Delay after auto up-shifts to
prevent double shifts, configurable from 500-1500 in 50ms steps,
750=default)
PULSE PER REV = 2
(Set the number of pulse per engine revolution - 4 cylinder=2, 6
cylinder=3, 8 cylinder=4, default=2)
RESTORE DEFAULTS? (Up button to restore factory default
configuration) (added on version 007)
CONFIRM RESTORE DEFAULTS? (Up button to
confirm the restore defaults)
ABOUT? (Displays current software version and product web
site address)
SAVE AND EXIT? (Up button to save and exit, down will
advance back to the first menu option)
- All settings are saved to flash
memory as soon as the menu is exited, automatically
Testing the downshift protection:
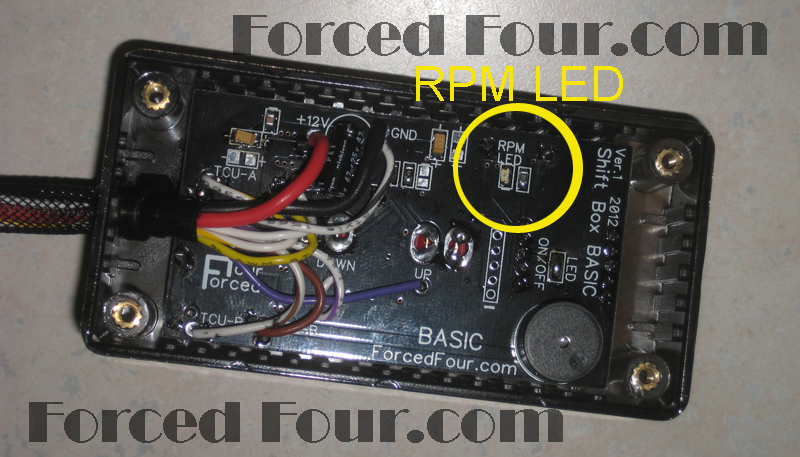
- On the bottom side of the shift
box is a yellow/orange LED. This LED does a bulb test
when the shift box is first powered up. See image for
exact location.
- This LED is used to indicate the
downshift protection is working. When the engine RPM's
are brought up above the set RPM, the LED will turn on.
When the RPM's drop below the set RPM the led will turn
off.
- Note some flicker on this LED is
normal, especially when near the set RPM due to timing
belt flex and noise. If excessive, this may indicate
your cam or crank angle sensor needs to be replaced.
Updating the firmware:
- The most recent Shift Box PLUS
firmware version is 007
- Please send an e-mail to
sales@forcedfour.com to inquire about updating your
firmware. Please note this shift box does not support
USB firmware updates and will need to be shipped to
Forced Four to be updated.
- (Note:
All settings will be set to factory defaults when
the firmware is updated)
Confused? Contact us at
sales@forcedfour.com
Check out our tutorial video of this
shift box in action!
Installation
Instructions
Click to open
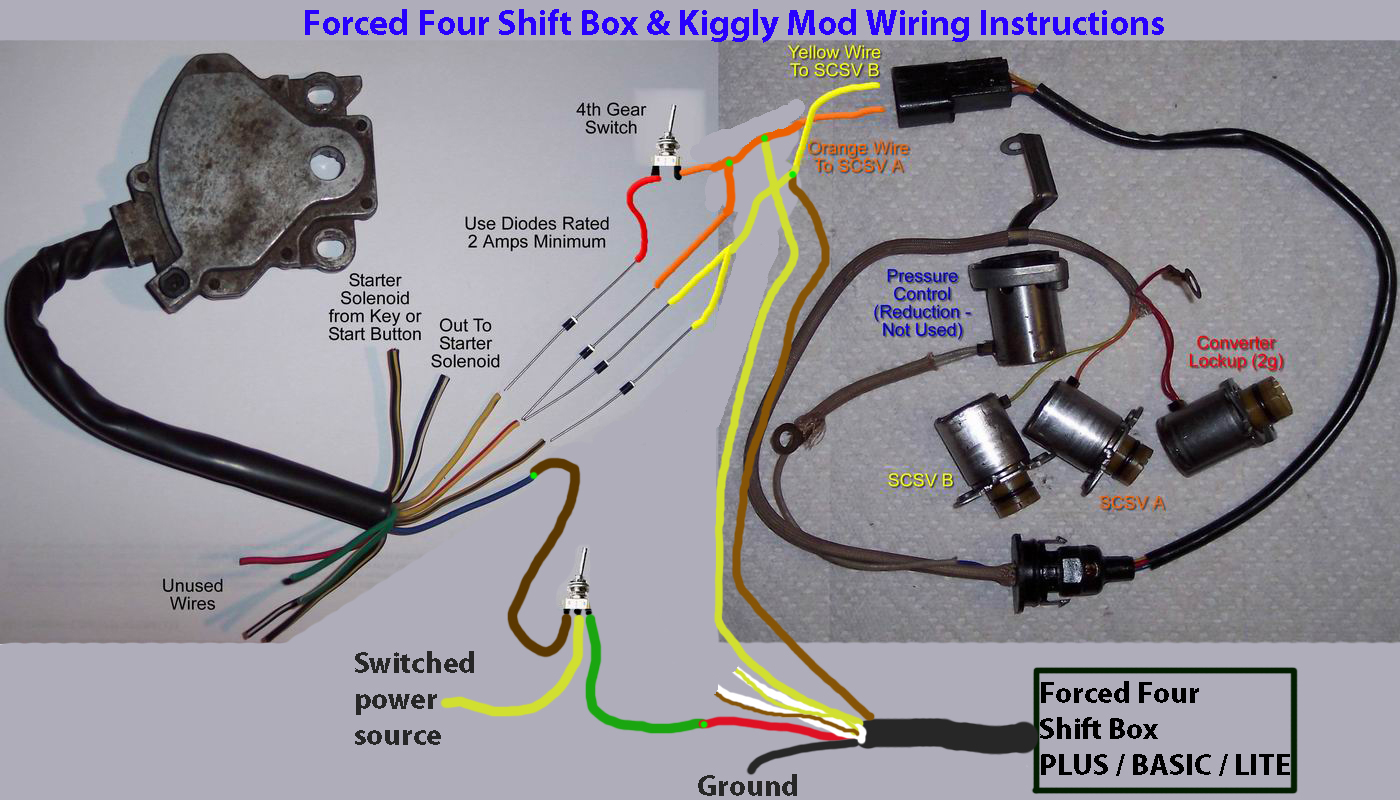
NOTE: The wiring is EXACTLY the same between the BASIC and
the PLUS!
 |