SMART 100 Shift
Box -
Product Support Page
Last updated 7/25/16
SMART 100 INSTALLATION INSTRUCTIONS
-
If used with a TCU or other method of controlling the
transmission, only one way of controlling the transmission
should be powered on at one time to prevent unexpected
control of the transmission or damage to the TCU. Use of our
TCU package or similar suitable switch/relay must be used to
power the TCU or shift box one at a time.
-
Use of diodes, provided with the TCU package, is necessary
to prevent damage to TCU.
-
The SMART 100 must be properly configured for your
transmission type before operating
-
Use of either the SMART handheld, SMART display, or SMART
gauge is required to configure device via the on screen
menu.
-
Mount the SMART 100 unit in the vehicle cabin away from heat
and moisture, routing wires away from a CDI ignition box or
high voltage coil wiring recommended to prevent erratic
behavior.
General Usage Instructions:
-
Once installed, this shift box is simple to use. Simply
press the up-shift button to advance to the next gear, or
press the down-shift button to drop to a lower gear.
-
This shift box will boot up in 3rd gear, unless configured
differently by the user, every time as a safety in case the
shift box would ever reboot due to a power connection
problem.
-
By default the downshift protection RPM is 4500RPM, see the
menu below to change this, or disable the downshift
protection.
-
To use the RPM up-shift feature, you must set the shift
points to your desired RPM in the menu. Set the shift point
~1000RPM sooner than you want the shift to be made to start,
and adjust as necessary. This is due to the delay inside the
transmission to engage the clutches. You must enable the
UP-SHIFTER in the menu to use this feature.
-
The overdrive off feature can be used by up-shifting to
overdrive gear. Press and hold the up button until the O/D
off LED illuminates and the shift box downshifts to the next
lower gear. To turn O/D back on, up-shift to the max gear
and press and hold the up button until the O/D off LED turns
off and the shift box up-shifts to overdrive gear.
-
The torque converter lock-up feature, when enabled, will
illuminate the green LED when the solenoid is turned on
-
Note that the shifts are made at full line pressure, if soft
shift is not configured or using pressure control solenoid
is not possible, learning the timing on when to make the
shift will make using this shift box much more pleasurable
on the street.
Forced Four SMART 100
INTERFACE MENU
To enter the menu:
Downshift to 1st gear then press and hold down shift
button until menu opens
Basic tips for easier menu navigation:
Default values are shown as underlined
Bold text is word for word what the shift box
will display
You can skip to the next menu option without
waiting for the text to be displayed
Brake switch will toggle some values the opposite
direction
Up button selects or toggles an item/value, down
button advances to the next menu item
Sub menus will return back to the heading of the sub
menu just exited
Main menu items have a double beep; sub menu items have
a single beep
Menu will automatically save settings and exit
after ~ 6 seconds of user inactivity
MENU
INTERFACE
(Up to select, down for next)
BRIGHTNESS = 5
(Set display brightness 1-5)
SCROLL SPEED = 3 (Set text scroll speed
1-5)
AUDIO = ENABLED/DISABLED
(This option mutes normal beeps, doesn't affect menu beeps)
DOWN SHIFT PROTECTION
(Up to select, down for next)
DOWN SHIFT PROTECTION = ENABLED/DISABLED
(Enable or disable down-shift protection feature)
DOWN SHIFT PROTECTION = 4500
(Configurable from 3500RPM - 7000RPM)
UP SHIFTER CONFIG (Up to select, down for next)
UP SHIFTER = ENABLED/DISABLED
(Enable or disable up-shifter feature)
1-2 SHIFT POINT = 5500 (Set the 1-2 shift
point, configurable from 5000-12000RPM, 0=disabled)
2-3 SHIFT POINT = 5500 (Set the 2-3 shift
point, configurable from 5000-12000RPM, 0=disabled)
3-4 SHIFT POINT = 5500 (Set the 3-4 shift
point, configurable from 5000-12000RPM, 0=disabled) *
4-5 SHIFT POINT = 5500 (Set the 4-5 shift
point, configurable from 5000-12000RPM, 0=disabled) *
5-6 SHIFT POINT = 5500 (Set the 5-6 shift
point, configurable from 5000-12000RPM, 0=disabled) *
OD DOWN SHIFT CONFIG (Up to select, down for next)
OD DOWN SHIFTER = ENABLED/DISABLED
(Enable or disable down-shifter feature)
MAX TPS = 50% (Set the maximum throttle
position allowed on overdrive before auto downshifting, 10-90)
DEBOUNCE = 50 (Maximum duration above MAX
TPS value before auto downshifting, 25-75)
LOCKUP CONFIG
(Up to select, down for next)
LOCKUP = ENABLED/DISABLED
(Enable or disable lockup feature)
LOCKUP SOLENOID = SOL-C (Configure which
solenoid output is lockup clutch) (MUST BE SOLENOID C)
1ST LOCKUP RPM = 0 (Lockup
above set RPM in 1st gear, 0=disabled, 1500-5500)
2ND LOCKUP RPM = 3000 (Lockup above set
RPM in 2nd gear, 0=disabled, 1500-5000)
3RD LOCKUP RPM = 3000 (Lockup above set
RPM in 3rd gear, 0=disabled, 1500-5500)
4TH LOCKUP RPM = 3000 (Lockup above set
RPM in 4th gear, 0=disabled, 1500-5500) *
5TH LOCKUP RPM = 3000 (Lockup above set
RPM in 5th gear, 0=disabled, 1500-5500) *
6TH LOCKUP RPM = 3000 (Lockup above set
RPM in 6th gear, 0=disabled, 1500-5500) *
MAX TPS = 70 (Turn off lockup above set
TPS 10-100%)
MIN TPS = 0
(Turn off lockup below set TPS 0-90%)
BRAKE SW = YES/NO (Turn off lockup when
brake pedal is pressed)
DEBOUNCE = 750 (Lockup debounce for
smoothing 250-1500)
PCS CONFIG
(Up to select, down for next)
PCS = ENABLED/DISABLED
(Enable or disable soft shift / line pressure control feature
for downshifts)
PCS SOLENOID = D (Configure which solenoid
output is PCS) (MUST BE SOLENOID D)
PCS FREQUENCY = 33Hz (Configure the PCS
solenoid operating frequency, 30-150Hz)
SOFT SHIFT = 15 (Downshift firmness from
10=firm and 20=soft)
ANALOG INPUTS
(Up to select, down for next)
AI1 = RATCHET / TPS / NONE
(Configure Analog Input #1)
AI2 = RATCHET / TPS / NONE
(Configure Analog Input #2)
DIGITAL INPUTS
(Up to select, down for next)
DI1 = UP-BTN / DN-BTN / BRAKE-SW / STALL-UP / O/D-OFF /
NONE
(Configure Digital Input #1)
DI2 = UP-BTN / DN-BTN / BRAKE-SW / STALL-UP / O/D-OFF /
NONE
(Configure Digital Input #2)
DI3 = UP-BTN / DN-BTN / BRAKE-SW / STALL-UP / O/D-OFF /
NONE
(Configure Digital Input #3)
DIGITAL OUTPUTS
(Up to select, down for next)
DO1 = O/D-OFF / TQU-RED / WINDOWED / STALL-UP / NONE
(Configure Digital Output #1)
STALL UP MODE
(Up to select, down for next)
STALL UP = ENABLED/DISABLED
(Enable or disable stall up control feature)
STALL UP TPS = 90% (Enter stall up mode when TPS
above this value with brake switch active)
STALL UP INPUT = YES/NO
(Use external input to activate stall up mode)
MAX STALL RPM = 5000 (Disable stall up
mode above this RPM)
WINDOWED MODE
(Up to select, down for next) (All below settings must be true
for output to be enabled)
WINDOWED MODE = ENABLED/DISABLED
(Enable or disable windowed output feature)
MIN TPS = 10% (Output enabled when TPS above
minimum)
MAX TPS = 90% (Output enabled when TPS below
maximum)
BRAKE SW = ON / OFF / ANY (Output enabled
if brake switch pressed, not pressed, or either position)
MIN RPM = 1000 (Output enabled when RPM
above minimum, 1000-12000)
MAX RPM = 9000 (Output enabled when RPM
below maximum, 1000-12000)
GEAR 1 = YES / NO (Output enabled in gear
1)
GEAR 2 = YES / NO (Output enabled in gear
2)
GEAR 3 = YES / NO (Output enabled in gear
3)
GEAR 4 = YES / NO (Output enabled in gear
4) *
GEAR 5 = YES / NO (Output enabled in gear
5) *
GEAR 6 = YES / NO (Output enabled in gear
6) *
ADVANCED
(Up to select, down for next)
SMART VERSION
(Up button to display current software version of SMART gear
display or SMART handheld)
PULSE PER REV = 2
(Number of pulse per engine revolution - 4 cylinder=2, 6
cylinder=3, 8 cylinder=4)
DISPLAY RPM
(Up button to display current engine RPM, useful for verifying
proper installation)
CALIBRATE TPS
(Up button to calibrate) (Hold full throttle until beep then
release throttle until beep)
FULL THROTTLE
(Press and hold full throttle until beeps)
ZERO THROTTLE
(Release throttle completely until beeps)
CALIBRATED (Confirmation of calibration)
DISPLAY TPS VALUE
(Up button to display current throttle position, useful for
verifying proper installation)
DISPLAY AI1 VALUE
(Up button to display raw AI1 value 0-255, useful for verifying
proper installation)
DISPLAY AI2 VALUE
(Up button to display raw AI2 value 0-255, useful for verifying
proper installation)
DISPLAY BRAKE SW
(Up button to display current brake switch value, useful for
verifying proper installation)
FORWARD GEARS = 3/4/5/6
(how many forward gears the transmission has)
ENTRY GEAR = 3
(Default gear for bootup, recommend 3rd in case of a power
supply glitch and reboot during normal use)
UP
SHIFTER DEBOUNCE = 120
(Debounce auto shift to prevent double shift, configurable from
50-250ms)
SHIFT SOL CONFIG (Up to select, down for next)
(Default varies depending on transmission type specified when
ordered)
1ST-GEAR
(Configure first gear
solenoids)
A = ON/OFF
B = ON/OFF
C = ON/OFF
D = ON/OFF
2ND-GEAR
(Configure second gear solenoids)
A = ON/OFF
B = ON/OFF
C = ON/OFF
D = ON/OFF
3RD-GEAR
(Configure third gear solenoids)
A = ON/OFF
B = ON/OFF
C = ON/OFF
D = ON/OFF
4TH-GEAR
(Configure fourth gear solenoids) *
A = ON/OFF
*
B = ON/OFF
*
C = ON/OFF
*
D = ON/OFF
*
5TH-GEAR
(Configure fifth gear solenoids) *
A = ON/OFF
*
B = ON/OFF
*
C = ON/OFF
*
D = ON/OFF
*
6TH-GEAR
(Configure sixth gear solenoids) *
A = ON/OFF
*
B = ON/OFF
*
C = ON/OFF
*
D = ON/OFF
*
RESTORE DEFAULTS
(Up to select, down for next)
CONFIRM? (Up button to confirm the restore
defaults)
ABOUT (Up button displays current software version and
product details)
SAVE AND EXIT? (Up button to save and exit, down will
advance back to the first menu item)
EXIT WITHOUT SAVING
(Up button to exit without saving changes)
*
Items marked with a * may not be shown depending on the number
of forward gears configured
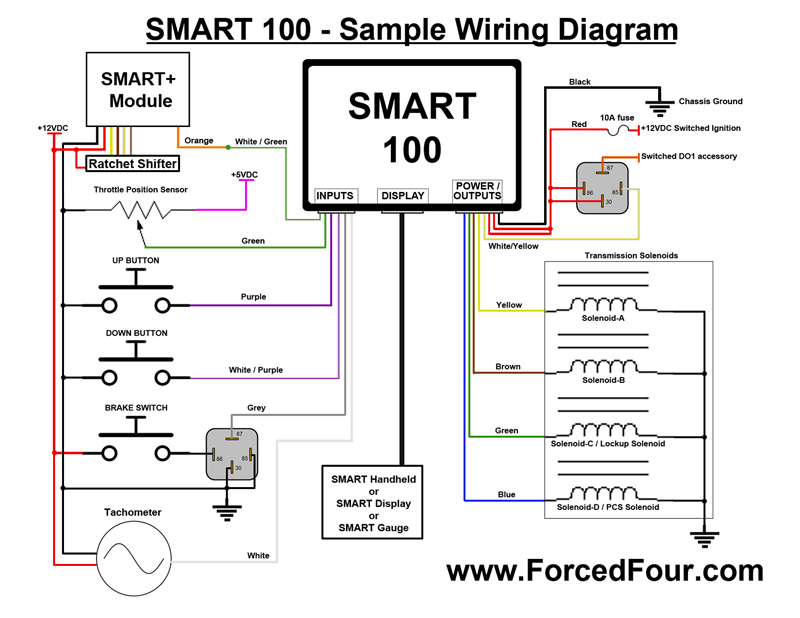
Wiring
instructions:
Wiring the SMART 100 shift box:
Any wires not used should be capped to prevent damage or
unwanted behavior!
Display 8 pin
connector
8 pin [power and
output] plug
-
Red wires are +12 volt power from the ignition switch,
connect both wires together
-
Black wire is ground, connect to a good clean chassis ground
-
Yellow wire goes to Shift Solenoid A
-
Brown wire goes to Shift Solenoid B
-
Green wire goes to Shift Solenoid C OR Lockup Converter
-
Blue wire goes to Shift Solenoid D OR Pressure Control
Solenoid
-
White/Black wire is Digital Output #1 (DO1) configured as
spare by default
6 pin [input]
plug
-
Green wire is Analog Input #1 (AI1) configured as TPS sensor
by default
-
White/Green wire is Analog Input #2 (AI2) configured as
spare input by default
-
Purple wire is Digital Input #1 (DI1) configured as up shift
button by default, pull low to ground
-
White/Purple wire is Digital Input #2 (DI2) configured as
down shift button by default, pull low to ground
-
Grey wire is Digital Input #3 (DI3) configured as brake
switch by default, pull low to ground
-
White wire is Digital Pulse Input #1 (DPI1) configured as
the RPM input / tach signal input
Updating the firmware:
- The most recent SMART 100
firmware version is 001
- Please send an e-mail to
sales@forcedfour.com to inquire about updating your
firmware. Please note this shift box does not support
USB firmware updates and will need to be shipped to
Forced Four to be updated.
- (Note:
All settings will be set to factory defaults when
the firmware is updated)
Confused? Contact us at
sales@forcedfour.com
|